

I personally find it much easier to learn new things by looking at a working system; as opposed to getting a new system up-and-running. Probably a hang-over from my childhood days dismantling anything that works…
In this article, I am sharing the quickest way to get a small jsp page connect to mysql instance, both running on docker containers.
- Assumptions
- Get the code
- Setting up the MySQL server container instance
- Setting up the jetty side
- Deploy an app and test jetty / MySQL connectivity
- How does the Jetty server container access the MySQL server container?
- Accomplishing the container wiring through ‘docker-compose’
- Newbie tips
Assumptions
For purposes of this article, I am assuming:
- To avoid any confusion, I recommend that you should NOT have mysql (server/client) or jetty on the local system. And local ports 8080, 443, 3306 are available for use.
- Java, ant build system is available
- Docker engine is available. In case of Ubuntu, you can find more information here.
- git is installed
- You understand that the code is meant to be simple (clear-text passwords, poor error-handling). Do not use it for anything beyond learning …
Get the code
Pull the latest bare minimum code (jars, Dockerfiles, jsp) from github
git clone https://github.com/p2c2e/min-docker-jetty-mysql.gitcd min-docker-jetty-mysqlEnsure there is no other local instance of mysql (port 3306 should be free) Note that there is no data folder at this point
Setting up the MySQL server container instance
docker pull mysql
./bin/dmysqlserver.sh
Check if the server is up and running
docker ps -a | grep mysql-server
docker logs mysql-server
Look for “mysqld : ready for connections”
At this point, not only is the mysql-server up, it should also have a new database called ‘TestDB’. You can verify that by running below commands:
./bin/dmysql.sh In the MySQL client prompt, run:
show databases;The TestDB database was created for you because there is a ‘init’ sql file in the ./startup folder. The mysql-server container executes all the files in that folder as part of initialization.
Setting up the jetty side
docker pull jettyNow launch jetty using the shell/batch script
./bin/djetty.shVerify jetty is up by checking the following:
docker ps -a | grep jetty-serverVerify if the site is up and running by visiting the Jetty Root
Since there is no ROOT.war distributed, there should be a context listing page with no apps deployed. Jetty is checking for webapps in the ./webapps folder
Deploy an app and test jetty / MySQL connectivity
Now deploy a bare-minimum webpp consisting of a index.jsp connecting to a DB and dropping/creating/listing the table row count.
ant This should create and copy over a ‘war’ file to the ./webapps/ folder
Check if the war was successfully deployed using :
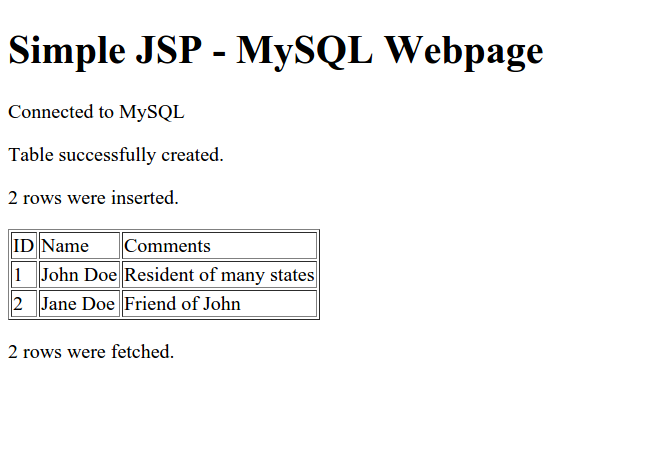
docker logs jetty-serverNow visit: http://localhost:8080/java-mysql-1.0/
It should display a page like below:
How does the Jetty server container access the MySQL server container?
Legacy Links -
- The primary way by which containers expose their services is through ports. The docker engine can expose pre-defined ports automaticaly or we can do that explicitly using the -p to:from options
- For one container to talk to another, the simplest way is to a) expose the mysqld port to the outside world and b) share the mysql servers IP to the jetty-server. This is done via –link option (see the ./bin/djetty.sh)
Though the wiring of the two containers were done in the shell scripts, we can ‘compose’ the two containers together so that the dependencies are clearer.
Accomplishing the container wiring through ‘docker-compose’
First verify that docker-compose is installed properly. Use this link to get you set-up.
Let us kill the existing containers before we can try out the docker-compose version of the application.
docker kill jetty-server mysql-server
docker rm $(docker ps -a -q -f status=exited)
Ensure you are in the root of the clone repository (root directory should contain the docker-compose.yml file). Now, run the docker-compose version of the application using:
docker-compose up If you used the non-daemon version, you will clearly see when the system is ready to accept requests. You can shutdown the servers by Ctrl-D.
Alternatively (if you want to run everything as a daemon)…
docker-compose up -d In this case, you would need to shutdown the servers using
docker-compose downAfter about 20 seconds, you will be able to visit http://localhost:8080/java-mysql-1.0/.
Newbie tips
- When building images using ‘docker build’, there are many occasions where there are intermediate images that might be left behind. Use ‘docker rmi
' to remove them - When you build and tag a new image - if there is an image already exists with that name, it gets untagged. Importantly, the image still remains in the cache. You will need to manually remove them
- Containers that have exited (normally or due to getting killed), continue to remain on disk. If not cleaned up, they continue to take up significant space. Remove them using ‘docker rm
' - alias the following command to make things easier. The command removes any containers that are lingering after they have exited:
docker rm $(docker ps -a -q -f status=exited)- You can copy-over/run the d*.sh scripts in the repo and use it for generically
If you run the dmysqlserver.sh from any directory, it initializes a brand new instance of mysql and stores the data in the ./data folder. It also creates a ‘startup’ folder where we can store any bootstrap / db-dumps to initialize the database Using the djetty.sh from any directory, it creates / uses the webapps/ subfolder to deploy apps Due to port and container name conflicts, you can only run one instance of jetty, mysql-server at any one time